Pages

Pages

Tuesday 29 January 2013

JENsations Sticks n Stones over GOSH Wild Lilac


JENsations - Sticks n Stones (1-2 dabbed coats depending on coverage) over
GOSH - Wild Lilac (2 coats)
topped with Gelous


I really love the look of JENsations Sticks n Stones. It is a fun black and white glitter topper with a bit of shimmer in the base. I just wish it was a bit easier to apply. I found the glitter would slide around a lot when I was trying to apply it. I kept getting so much at the tips and then trying to drag them around to get even coverage. I used a much lighter hand this time though and achieved a much smoother surface than I did last time. I also knew when to stop and wait for it to dry and add a second coat instead of just continuously prodding the glitter around and getting a lumpy base. Next time I think I will try using a sponge to apply the glitter like Sammy from the Nailasaurus did. Of course I say that now but next time I will probably be too lazy... I used Gelous on top this time (instead of Seche Vite) and didn't have any issues with glitter curling and lifting off this time!

Here is a swatch of GOSH Wild Lilac on it's own (2 coats, no top coat)


I found this on sale at Shoppers! I think it was maybe $4 each? I can't find my receipt but I will update this once it shows up on my visa statement and I can see the transaction.

I love the look of GOSH bottles. I think they look so high end when really they are a decently priced brand. The bottles are deceiving though. They only contain 8ml of polish - standard is 15 ml. So I guess they are about the same price as Esse or China Glaze then. But honestly I don't think I would really ever finish an entire bottle of polish with so many in my stash! So I'm okay with paying half price for a half sized bottle.

The brush was teeny tiny on this. Short and skinny. I quite liked it. It was very accurate and I didn't accidentally pick up too much polish as can happens sometimes with longer brushes. I found the polish self leveled quite well and I didn't find that the extra brush strokes showed at all on the nail. This might be an issue though painting larger nails like big toe nails, or if you bought a metallic/frost finish shade.

Wear time on this was just okay. I got 3 days' wear out of it before chipping but 2 of those days were the weekend and I did absolutely nothing. Only 1 day of wear at work where I'm typing lots. I was also expecting it to last longer because I wore Sticks n Stones over it. The last few times I wore Sticks n Stones I think I got 5 or 6 days of wear without chipping. To be fair though I am using a different base coat now (Mavala Barrier Base - before I used OPI Nail Envy... should go back to the OPI Nail Envy but it's sooo expensive!) Also, as I mentioned earlier I used Gelous as top coat instead of Seche Vite which stopped the glitter from lifting/curling but may have meant the mani didn't last as long. Maybe Seche Vite on top of Gelous next time?

Sunday 27 January 2013

Sally Hansen - Fearless Fog


Sally Hansen - Fearless Fog (2 coats) with Seche Vite
Mavala - Barrier Base Coat

Application was AMAZING with this polish! 2 easy coats that went on smoothly and self leveled. The brush is probably the best I've ever used. It is flat like the OPI one so it smooths out the polish nicely but it is skinnier than the OPI brush and tapered. This makes it really easy to get a nice arc shape around the cuticles and makes the brush extremely accurate. It also dried pretty quickly and was probably the fastest mani I've ever done. I didn't do any clean up at all on these nails! This is a polish I've had forever and kind of forgot about with all the other polishes I have to choose from haha


Unfortunately it didn't work well with Seche Vite and the amount of shrinking I got was kind of ridiculous. The picture above was taken the next day. The polish on my thumb nail also cracked somehow. When I first saw it I was really worried my actual nail had split but luckily that was not the case it was just the polish. Since the application was so amazing I will definitely give this polish another chance sometime and try it with another top coat. Hopefully it will work better with another top coat.
_____________________________________________________________________

Update: I didn't really notice this when I was wearing it, but next to my other gray polishes it looks much more brown/purple. I think maybe I should reclassify this as a taupe.


American Apparel - Echo Park
Sally Hansen - Fearless Fog
Avon - Grey Flash
OPI - Skull & Glossbones

Tuesday 22 January 2013

Black Water Spotted Splotches/Rorschach over OPI Meet Me on the Star Ferry

Here's my second attempt at a Water Spotted Mani. You can see my first attempt here. I think the pattern is more obvious on this one because there is much more contrast with the base color. 

For this mani I used OPI - Meet Me on the Star Ferry (2 coats), Sally Hansen - Black Heart, and Garnier Fructis Aqua Styler Long Hair hairspray.


I'm pretty happy with the way my right hand turned out. I think my favorite nail is my right pinky nail since I got so many little bubbly looking water spots on it.

I like my pinky on my left hand too. II also like how my ring finger kind of looks like a tree or something. I don't like my middle finger at all though. There's too much black and it reminds me of a ski mask or something haha

The first time I tried to do this nail, I only got a bit of black on it. So I decided to dunk my finger in again before cleaning up. I didn't aim my dip very well though and ended up going over the same spots twice. The end result reminds me of something from a Rorschach test.


I originally watched cutepolish's tutorial before attempting this technique. After my second attempt, I watched Colette's tutorial. I found that while cutepolish gave a good quick overview Colette was more helpful with trouble shooting especially if you aren't able to find the spray hand sanitizer. I have been using Garnier Fructis Aqua Styler Long Hair hairspray but found that the "spots" were more like large splotches. No matter how far away I spray, once those droplets hit the water they expand pretty quickly. If I don't get myself lined up with the water immediately, I'll end up with larger spots (which I like too it's just a different look). I'll try out some other chemicals for spraying next time. Here's Colette's video


Monday 14 January 2013

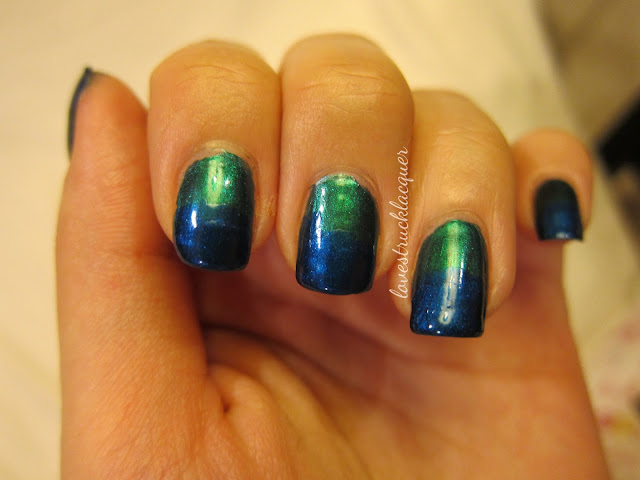
Swatch: Sephora + Pantone Universe - Evergreen


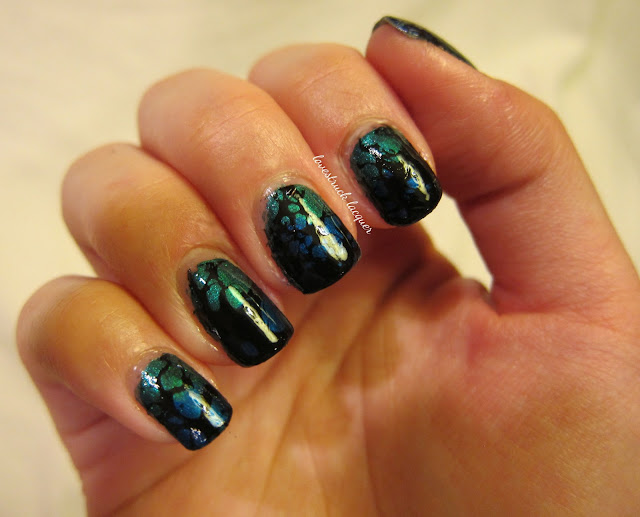
I bought this polish a while ago when I went to Vegas... back in October. It sat in my untrieds for the longest time. It looks really blah in the bottle and you can't see the gorgeous duochrome shift until it's on the nail. Usually it's the other way around where it looks gorgeous in the bottle and the duochrome isn't as obvious on the nail. Because of that I actually forgot why I bought it lol. Usually I'm not really a fan of green but I love the teal/blue shift this has! Unfortunately I found the shift wasn't that obvious in real life. It showed up well under the lamp that I use for my nail pictures but in other lighting wasn't as visible. I ended up doing a gradient over it and then trying out the black spotted technique... see that mani here

I used 2 coats for this swatch. The brush was shorter than normal and didn't hold much polish. I barely wiped off any polish from the brush and still had to re-dip into the bottle for each nail. I found that the polish kind of stuck to the nail rather than flowing nicely and I needed more polish than usual. Once I got that figured out though the polish didn't give me any problems. The brush was small and had good control. The polish felt a bit thin and flaky on the nail though, although this may have just been my topcoat or something? I used Mavala Barrier Base coat and Seche Vite top coat.

Saturday 12 January 2013

First Water Spotted Mani with Evergreen and Unfor-greta-bly Blue

I've been wanting OPI Black Spotted ever since I first saw it... but since it was (is?) available exclusively at Sephora stores in France there was no hope of me ever getting my hands on it. I was really happy when I found this water spotted technique on YouTube! It creates a fairly similar effect, although with more effort than simply painting on a polish. But I'll take it!


I think my right middle finger nail is my favorite! On the rest of my nails, the spots are bigger than I wanted them. I guess I was spraying too close to the water. I also ended up with some large black areas which I wasn't too happy with but this isn't bad for a first try. I think I'll try this soon with other colors!

For this mani, I started off with a base of 2 coats of Evergreen from the Sephora + Pantone Universe collection (see swatch on it's own here). I wanted a gradient so I added OPI Unfor-greta-bly Blue at the tips. I didn't bother using a sponge for the gradient, I just used the polish brush since I figured it would be covered by the water spotting. I used Sally Hansen Black Heart and Garnier Fructis Aqua Styler Long Hair hairspray for the water spotted technique. 

Here is a picture before my nails hit the water:


This technique isn't too hard. If you know how to water marble already you should find this really easy. If you've never water marbled before you may have issues with the polish spreading but you will just need to figure out the right type of water and water temperature that works. Also some polishes won't work with the water.

Basically you start with a cup of room temperature, filtered water. Then drop black polish onto the surface of the water. It should spread out. Immediately spray the surface of the water using either hand sanitizer or hair spray. The spray will break up the black and you should have clear spots. It might take a few tries to figure out how far away to spray. If you spray too close to the water the spots will be too big. From there, it is exactly the same as a water marble. Line up your nail(s) with parts of the pattern that you want on your nail, dip into the water, clean up excess polish from the surface of the water, pull your finger(s) out, clean up. Done!

I followed this tutorial from cutepolish except I used hairspray instead of hand sanitizer spray that she uses


Sunday 6 January 2013

Water Marble with American Apparel Malibu Green + Sally Hansen Whirlwind White

I really couldn't decide what to do with my nails last night. I had a kind of... nail painting block? Usually I have so many ideas... These days I don't really know what to do. I don't even feel like buying more polish... something must be wrong with me haha

Anyway since I haven't done a water marble mani in forever that's what I went with


Instead of using tape around my nails I decided to try applying a generous amount of Vaseline to keep the water marble polish from sticking to my skin. In a way this worked better because it was more precise and much easier to get it right along the edge of my nails, and I could apply it on my cuticles and under my nails. Unfortunately, wiping it away was trickier than I thought it would be. You need to wipe away from the nail, and don't lift off that tissue/paper towel until you are at least at your second knuckle! I tried wiping sideways, along my cuticle, and the polish that was on my skin ended up rolling up into a wad and landing on my nail. That is what happened on my right middle finger. I tried to wipe off the wad of polish and ended up with no marble there just the base coat was left. Blah. On a few of my other nails I lifted the paper towel off my skin too soon and the leftover polish stretched into this kind of goo and again landed on my nail. And that led to more blank spots. There are also a few blank spots due to accidentally getting Vaseline on the nail.

So because it was my first time trying this with Vaseline instead of taping around the nail, this ended up a bit sloppy in terms of random blank spots and ruined the final result a bit. I think I also maybe swirled a bit too much on my right hand as you can see on my right ring finger. I like my lines really fine when water marbling but I think maybe I did too much. I managed to only dip 6x though (thumbs and pinkies alone; index, middle, and ring fingers together) which saved a lot of time. Now that I've got dipping multiple fingers mastered maybe I will marble more often :)

***EDIT I forgot to mention that I also used 2 drops of Malibu Green for every 1 drop of Whirlwind White when I was making my "bulls-eye" on the water for my left hand. For my right hand I just used 1 drop of each polish for each ring. I think that made the stripes of green thicker and more vibrant on my left hand. Also I really like the gradient fade on my left index finger. I somehow "popped" one of the rings on my "bulls-eye" when I was trying to create the marble design and so the colors were kind of bleeding together in one of the rings. I wonder if I could somehow master that technique....?***

Wednesday 2 January 2013

New Years Nails!


Happy New Year everyone! Sorry this post is super late! One of my New Years' resolutions is definitely to post more haha. Anyway you can follow me on instagram (lovestrucklacquer) for more frequent, up to date posts of my nails. It's just more convenient for me to post from my phone because then I can do it during my lunch break at work. Also the filters are useful when I can't get the lighting to work with my mani. I really need to fix my light box. I miss summer with its longer hours of sunshine!

The silver is 2 coats of Sally Hansen Celeb City topped with Essie Set in Stones from the Luxeffects collection. The gold is 2 coats of Revlon Gold Coin topped with Deborah Lippmann Boom Boom Pow! I was surprised how tinted the base of Boom Boom Pow! is. I thought it was just clear base but noticed that it changed the base color quite a bit in this mani. You can see some more silvery looking streaks on my nail if you look closely.


I also started using these 2 Mavala products so hopefully my nails will stop breaking/peeling! 

First impressions:
Scientifique has a very very light minty eucalyptus kind of smell. I was pleasantly surprised as I was expecting a strong chemical smell. Absorbs quite quickly, quite thin and watery.

Barrier base is extremely watery for a base coat. Goes on milky and dries clear. Accidentally put too much on because it is so watery and needs extremely thin coats. Brush is long and skinny and very accurate. Couldn't smell anything at arms length, no normal nail polish smell which is impressive.


It's only been a few days but my nails feel much better already! Even after I get out of the shower my nails are not bendy! Not sure if this is from the Scientifique or the Barrier Base since I started using both at the same time.

Design by | SweetElectric